Since I couldn't get any assistance on this matter, I went ahead and did my own thing. Just to let you know that I'm not responsible for the void of warranty on the product, but being hygienic is crucial in the game of PE. Rust due to moisture buildup is not something you want to have in the cylinder as it's a promotion to sepsis and bacterial infection. Improper cleaning and lubrication will cause bacterial infection and suction failure. I wish the full kit comes with the upgrade design and tool.
In the previous post, you saw how bad the rust was forming. The 0.5mm washer and the c-clip was pratically turning orange due to rust. Even if you don't see rust, the cylinder's sealing cap must be removed for maintenance to prevent bacterial formation. So, on with the mod.
- Find yourself a good strong wire around 8 to 10in (20 to 25cm) long. A salvaged bicycle spoke is a good example. Thick and strong, which does not bend under pressure.
- Find a drill bit that's barely larger than the wire's diameter. I mean barely. Too large of a diameter may damage the cylinder's wall and the washer-clip.
- Drill two holes at the best position possible, away from the washer-clip, directly opposite sides. Never one hole, but two holes instead. This provides proper downward pressure to prevent sealing cap damage during removal proceedure.
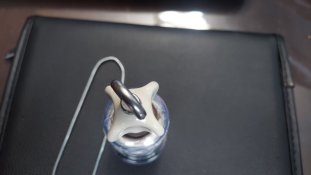
- Bend the wire to match the holes for both sides.
- Bend the ends of the wire slightly inward to preven the scratching of the sidewall of the vacuum cylinder.
- File down both ends of the wire to ensure flat contacts on both sides. I use 1200 grits sandpaper to make the surface nice and smooth.
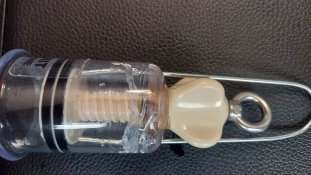
When you try to remove the sealing cap, make sure to twist the cap all the way to the bottom until you hear the click. This means the cap's twisting body is no longer nested inside the twisting knob. Insert your wire tool, and push downwards with equal force on both side. It should not take more a 2 lbs of weight (~0.9kg) to push the sealing cap out.
Make sure to wash everything with antibacterial soap and warm water. If there's just, I use a bit of PB Blaster/WD40 with a cotton swap, squirl the saturated chemical around the washer and c-clip, leave the chemical to remove the rust in 5 to 10 minutes wash the cylinder out thoroughly, and dry all components well.
Make sure everything is nice and fully dry before adding good helping of grade silicone grease around the o-rings, and pack the grease all around the washer and c-clip to prevent moisture exposure. Push the sealing cap back up and engage it to the twisting knob.
Now, you have a nice clean unit for another week. Do this weekly. Bacteria counts in that chamber after a week is no joke. Using ADS with broken skin and a vacuum full of bacteria will get you severely ill.